Your Cycling Variability Index and Why It Matters
I was several years into triathlon training and racing before I got my first power meter: a beautiful Firecrest Zipp 808 wheel with a G3 Power Tap hub-based power meter. It’s sort of ancient technology now, but at the time, it was state of the art and my husband John bought it for me for Valentine’s Day. We joked that it was my diamond necklace – goodness knows it cost more than jewelry.
My coach at that time instructed me to look at the numbers, but not to worry about hitting a target until we had the chance to dial in zones. This gave him time to see what sorts of power I produced – and how I produced it.
When I first started riding with power, I thought it was simply about measuring watts. But those first few rides taught me there was much more to the power game.
After my first ride, I came home and told my coach, “There’s something wrong with it. The number jumps all over the place.”
He said, “There’s nothing wrong with the power meter. You are making it jump like that.” He was nothing if not direct – old school, tough love type of dude.
That was when I first learned about variability index and what an important metric it is for triathletes and time trial cyclists. In this post, I’ll share that learning with you.
What is Variability Index?
Variability index (VI) is a measure of the smoothness or evenness of your power output, as it identifies the differential between your normalized power and your actual power output. Normalized power is an estimate of what your power would be if you applied an even force throughout the ride. It is a way to calculate the intensity factor of any given ride.
Because triathletes have to run after cycling, we want to keep this variability index as close to 1.0 as possible. A perfect score of 1 means that your actual power output and your normalized power output are the same.
You may find that when riding on the trainer, your VI is 1.0, unless you are doing hilly simulated courses or interval workouts. If you are doing an interval workout, you should only look at the VI for the interval sets. Given the nature of the intensity sets and the recoveries, VI for the totality of an interval based ride will trend higher.
When riding outside, a perfect 1.0 is not usually possible. So, for flatter terrain, we look for a VI of 1.05 or less. As the terrain gets hillier, we account for the changes in power that come from climbing and descending and look for a VI that is 1.1 or less. If your VI is higher in these cases, you have uncovered an area of opportunity that will allow you to get more out of your effort and go faster on race day.
This low VI matters not only for your bike speed, but also for how well you run off the bike. This article provides a review of studies that demonstrate the impact of low or high VI rides for the run.
How do we improve VI?
Great question! It’s a skill we learn as we get more experience cycling – particularly outside, but we can also work on it on the trainer.
Improving VI comes from controlling big peaks or spikes in power (what is often referred to as “burnt matches”) and big valleys or dips in power (which represent a loss of speed and momentum). How much we can control the peaks and valleys is dependent somewhat on terrain. For example, you will need to generate more power at times to climb. And, on steep or dangerous descents, you will often stop pedaling or slow pedaling. This is why VI for hillier rides can be higher – there is necessity for some peaks and some valleys.
As you ride, think about bringing the valleys up and the peaks down – to flatten out the power line. I like to visualize an even power line when I ride.
The image below shows you a ride with a 1.24 VI, which is very high for any terrain:
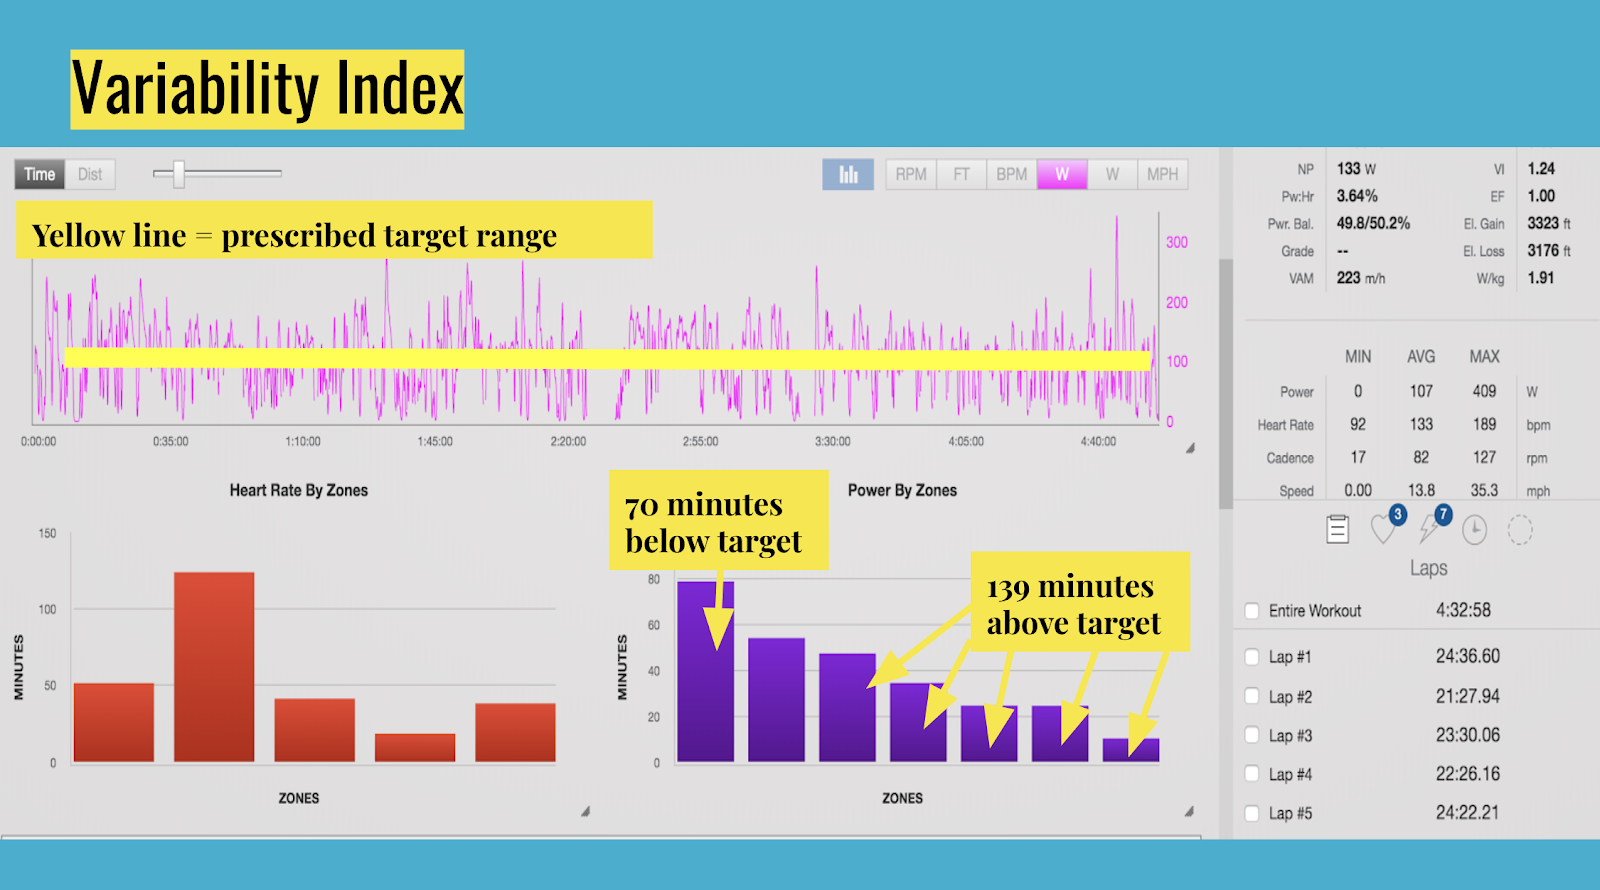
You can see the spikes (above the yellow line) and the valleys (below the yellow line). This leads to a majority of the ride being either above or below the targets – lots of burnt matches and plenty of missed opportunities for speed and momentum. This is also torching this athlete’s legs for the run.
Below is a comparison of two riders, both riding the same course on Zwift (VenTop). The first image shows a VI of 1.03. The second image shows a VI of 1.1.
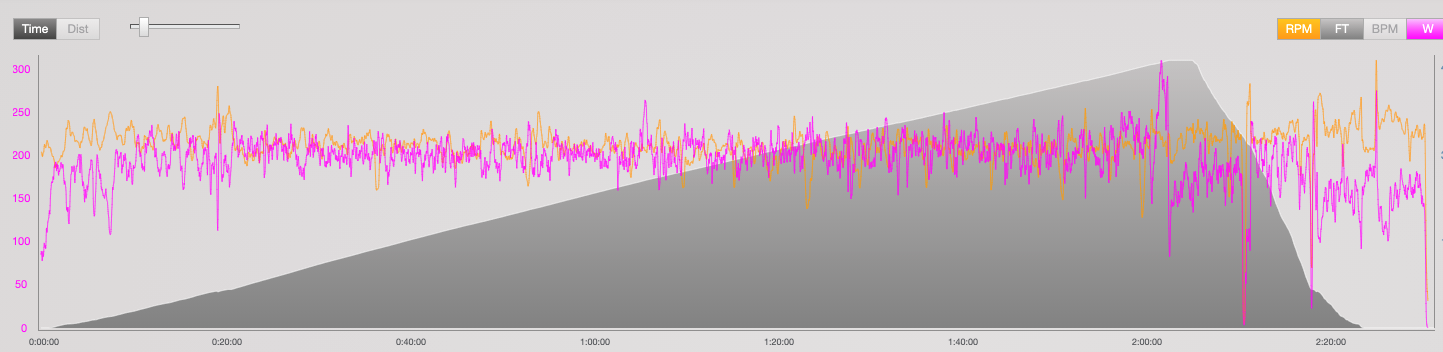
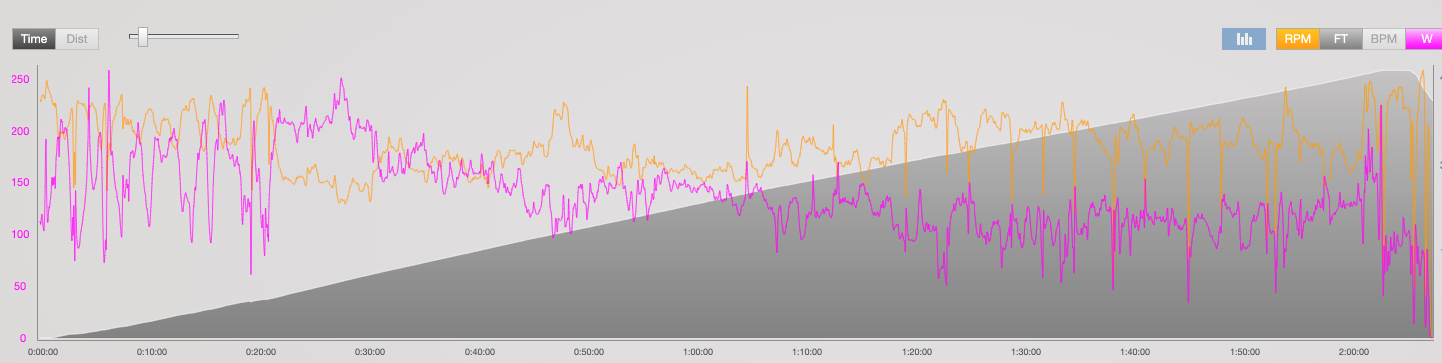
From a glance you can easily see the difference in the evenness of the power application. You can also see how the spikes at the front half (in the second image) impact power production in the last third of the ride. Those “burnt matches” take a bite and make it hard to hold a sustained effort later on in the ride.
The goal is to develop an even application of power, without big spikes or valleys in power like the first image.
In climbing – don’t try to “attack” a hill. Rather, control your climb as you go. We can climb much slower than we think we can. A bike will stay upright as slow as 4 mph.
Work on efficient shifting with large or small changes in terrain. This is one good reason to ride simulation courses when indoors so you can learn how to shift into changing terrain. It’s not the same as outdoors, but it can help the learning process. Additionally, this is why we recommend against using ERG mode, as that won’t help you learn to produce your own power.
On steep descents or in areas where you must slow for safety, don’t worry about the valleys–or those dips in power. But, if you find yourself coasting or soft pedaling when there is no need to, find that as an opportunity to apply an even effort and pedal continuously. This is one thing the power meter taught me when I first started using it: I tended to coast needlessly. Missed opportunity!
Smoothing your VI is a process – and practice makes progress (not perfection). So, use this post as a reminder for a “form check” when cycling, and over time you will see that your even application of power improves.